
Appearance
Window, Tab and Split
Otty's workspace is built from three nested levels. Knowing how they relate makes the rest of this section — tabs, splits, drag-and-drop — easy to reason about.
window
├── tab
│   └── pane (terminal)
├── tab
│   └── pane (folder)
└── tab
    └── split
        ├── pane (terminal)
        └── pane (file)
A pane is the leaf at the bottom of every branch — the content you actually interact with (a terminal, file, folder, or URL). Windows, tabs and splits are the containers that hold them.
Window and Tab Title
The window title (shown in the title bar) and the tab name (shown in the tab sidebar or bar) are tracked separately, so a program can label its tab differently from the window.
How titles follow the running program
By default both titles follow the program running in the focused pane, using the standard terminal title sequences most shells emit from a precmd hook:
| Sequence | Sets | Drives |
|---|---|---|
| OSC 1 — set icon name | the icon name | the tab name |
| OSC 2 — set window title | the window title | the window title |
| OSC 0 — set both | icon name and window title | both |
Most shells emit OSC 0, so the tab name and window title show the same text out of the box. A program that wants a short tab label and a longer window caption can set them independently — a compact name via OSC 1 for the tab, and a fuller description via OSC 2 for the title bar.
When a program only sets a window title (OSC 2) and never an icon name, the tab name falls back to that window title — so the tab stays labeled either way. Switching tabs updates the window title to match the newly active tab.
To decide the title yourself — per project, per agent, or per host — see Tab rules below. To stop programs from touching the title at all, turn off Programs Can Set the Title in Settings → View.
Rename and prefix
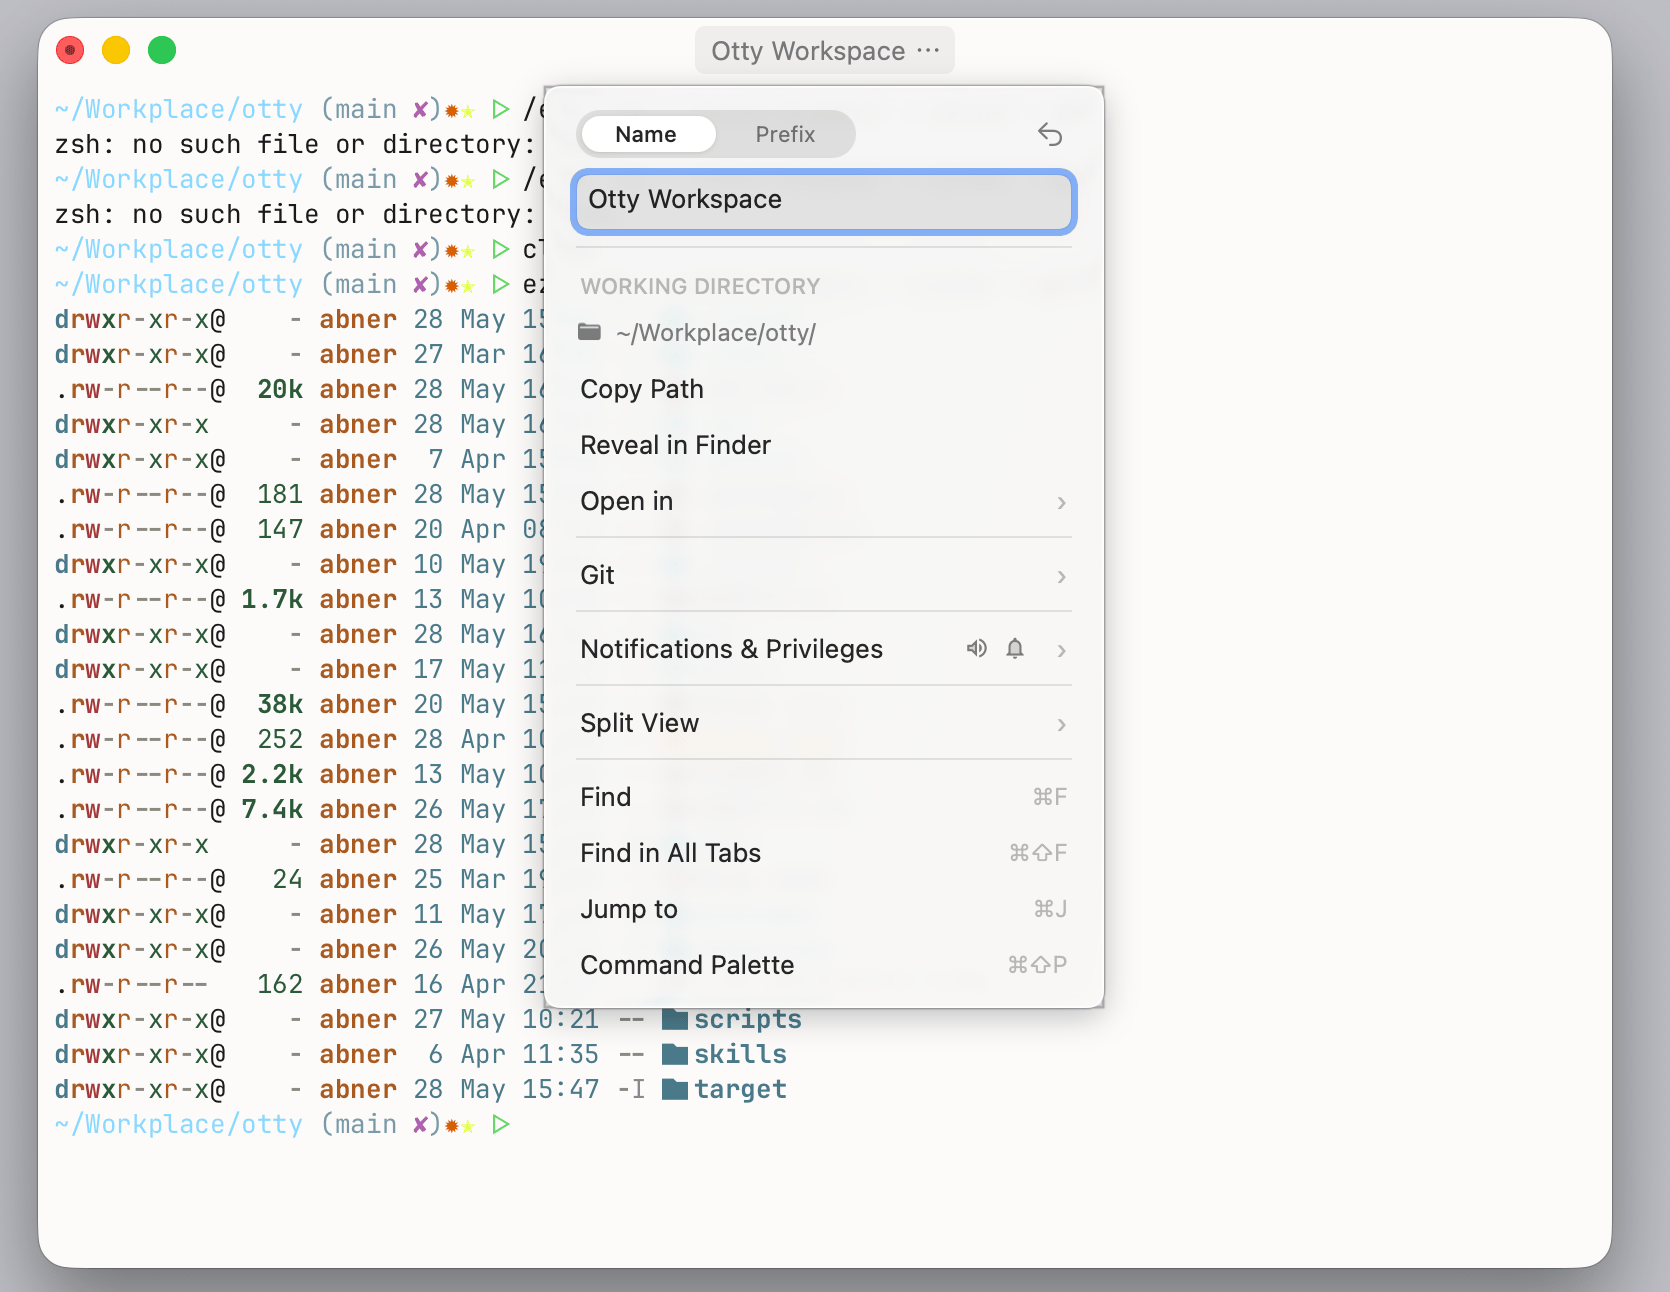
To override the automatic title, right-click a tab and choose Rename Tab... (also in the Command Palette and the Shell menu). The dialog offers two modes:
- Name — a fixed title that fully replaces the dynamic one. OSC updates from the program are ignored while a name is pinned, so the label stays put no matter what the program reports.
- Prefix — text prepended to the dynamic title, so it keeps updating while staying identifiable. For example, a
prod:prefix in front of the live program name readsprod: ssh db-01and follows the program as it changes.
Leave the Name field empty, or hit the reset button, to drop back to the automatic title. A renamed or prefixed tab keeps its customization across session recovery.
Tab rules
Renaming one tab by hand is fine once. When you want every tab in a project to look a certain way, open Settings → View. The Tabs & Title card decides three things per tab, each with its own Configure… button:
- Project Alias — a short name for a project, e.g.
Ottyinstead of~/Workplace/otty. - Icon — an icon for the tab. Pick one from the built-in set or type any emoji, and give it a colour. Colours are the terminal's own, so they follow whatever theme you're on.
- Title — a template for the tab label.
Each row shows how many rules it currently has; Configure opens the editor.
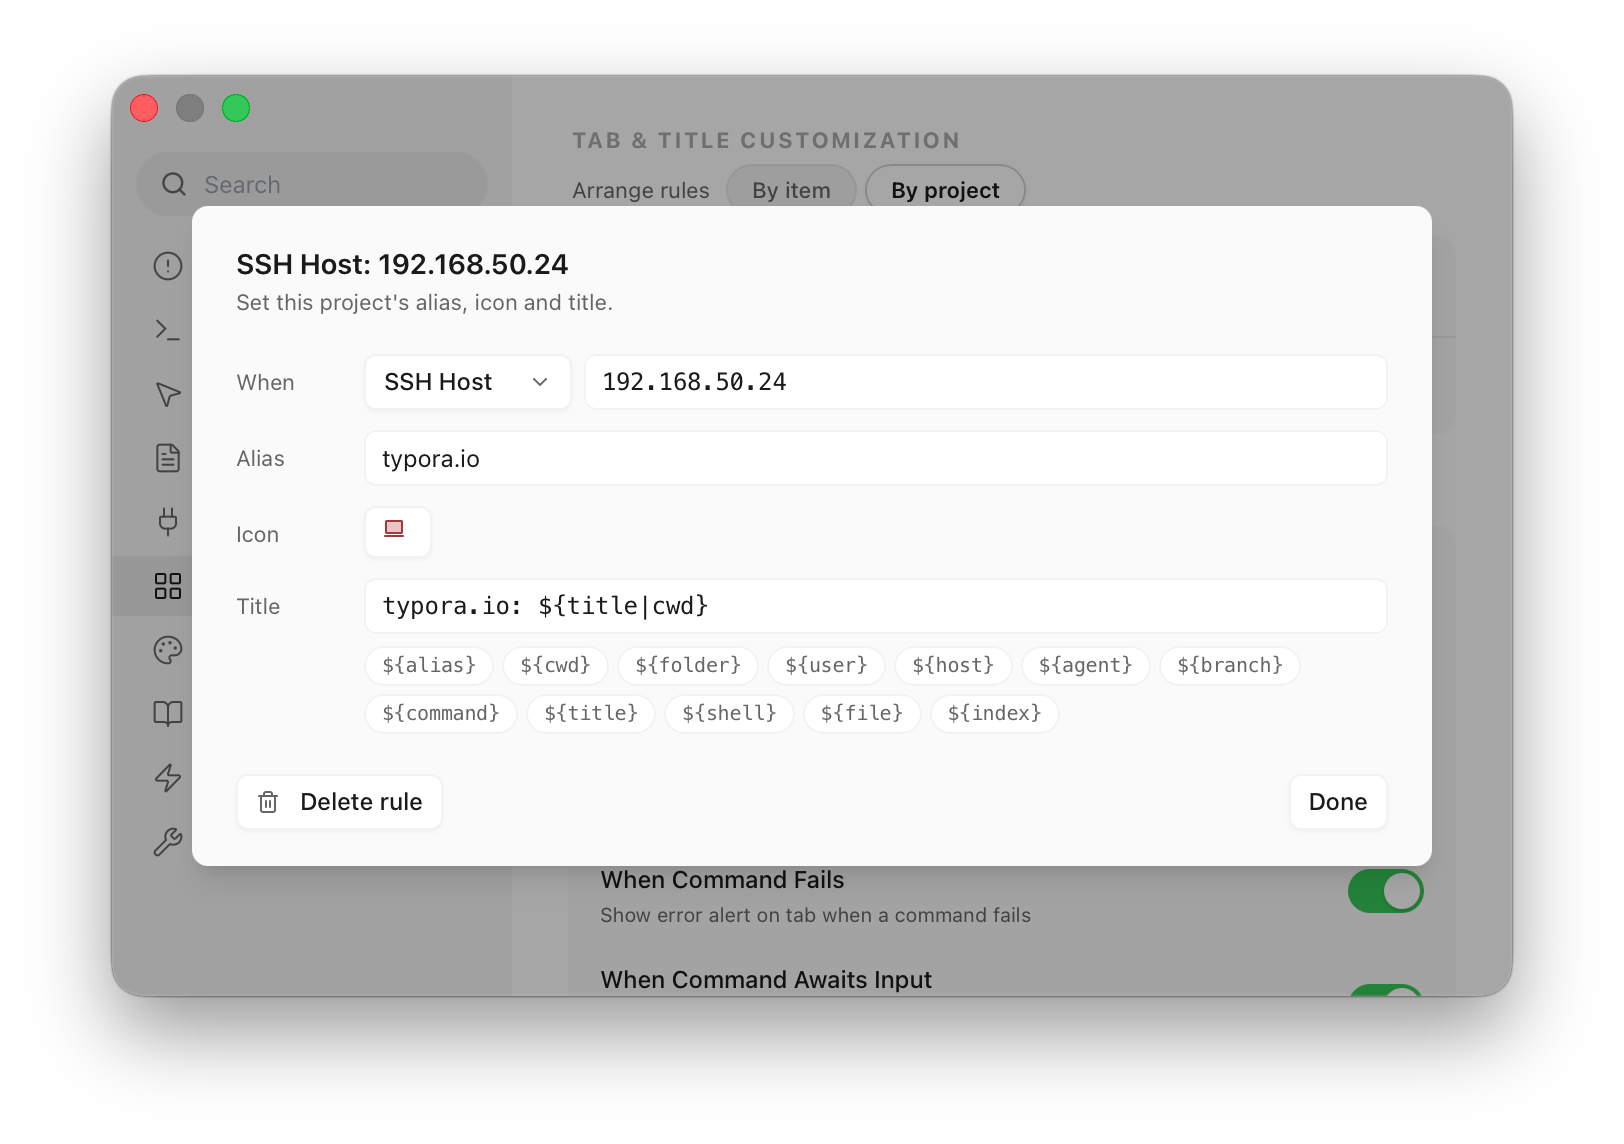
Inside, every rule starts with a When condition — a working-directory path, a foreground command, a coding agent, an SSH host, or a file name pattern like *.md for file and folder panes. A path with no * also covers everything beneath it, so a rule on ~/Workplace/otty keeps applying as you cd around the project.
Order is priority: the topmost rule that matches wins. Alias, icon and title are decided separately, so a broad ~/Workplace/* rule can hand every project the same folder icon while a rule above it gives one project its own title.
Titles are templates. Click a variable pill to insert it:
| Variable | Expands to |
|---|---|
${alias} | The project alias resolved for this tab |
${cwd} | Working directory, with your home folder shortened to ~ |
${folder} | Just the last path component |
${user} / ${host} | SSH user and host (host is empty locally) |
${agent} | Coding agent bound to the pane, if any |
${branch} | Current git branch |
${command} | Foreground command line |
${title} | Whatever title the program itself set |
${shell} / ${index} | Shell name, and the tab's position in the window |
A variable with nothing to show expands to nothing, and a separator left stranded beside it is removed — so ${folder} · ${branch} reads otty outside a git repository rather than otty ·.
Sometimes vanishing isn't what you want. ${title} is empty until a program sets one, so Typora: ${title} spends the first part of a tab's life reading just Typora. Name a fallback with | and the first variable that has a value wins:
| Template | Empty ${title} | Once a title arrives |
|---|---|---|
Typora: ${title} | Typora | Typora: README.md |
Typora: ${title|folder} | Typora: Typora-V2 | Typora: README.md |
A chain can be any length — ${title|file|folder|cwd} walks down until something sticks. To end it in a word rather than a variable, quote it: ${title|'Untitled'}. Quoting is what makes it text; an unquoted Untitled would be read as a variable name, and unknown names expand to nothing.
By item / By project, above the rows, arranges the same rules two ways. By item is the view described above — one row per thing a rule can set, and where you order priority. By project gives one row per condition instead, so you can open ~/Workplace/otty and set its alias, icon and title together.
Where the icon sits
A tab has room for one small indicator, and both your icon and Otty's status badges want it. Icon and Badge, in the Tab Icon & Badge group, decides how they share:
- Combined (default) — one indicator on the right. It shows your icon, and a status badge takes it over while a command is running, has failed, or is waiting for input. Nothing competes for space.
- Separate — the icon moves to the left of the tab label and badges keep the right. The shell name (
zsh,fish) is hidden, since the icon now says what the tab is; a file or folder pane's own icon becomes the tab icon when no rule supplied one; and the window title carries the icon as well.
Programs Can Set the Title, inside the Title editor, is on by default. Turn it off and programs can no longer rename tabs, which is what you want once your rules decide the titles; otherwise a shell that rewrites the title at every prompt fights them.
A rename or prefix you set by hand still beats a rule — the rules provide the default label, not a lock.
Window
A window is a top-level OS window. It owns the title bar, the tab sidebar (or horizontal tab bar), and all the tabs inside it. You can run as many windows as you like — across multiple displays or Spaces.
Details Panel
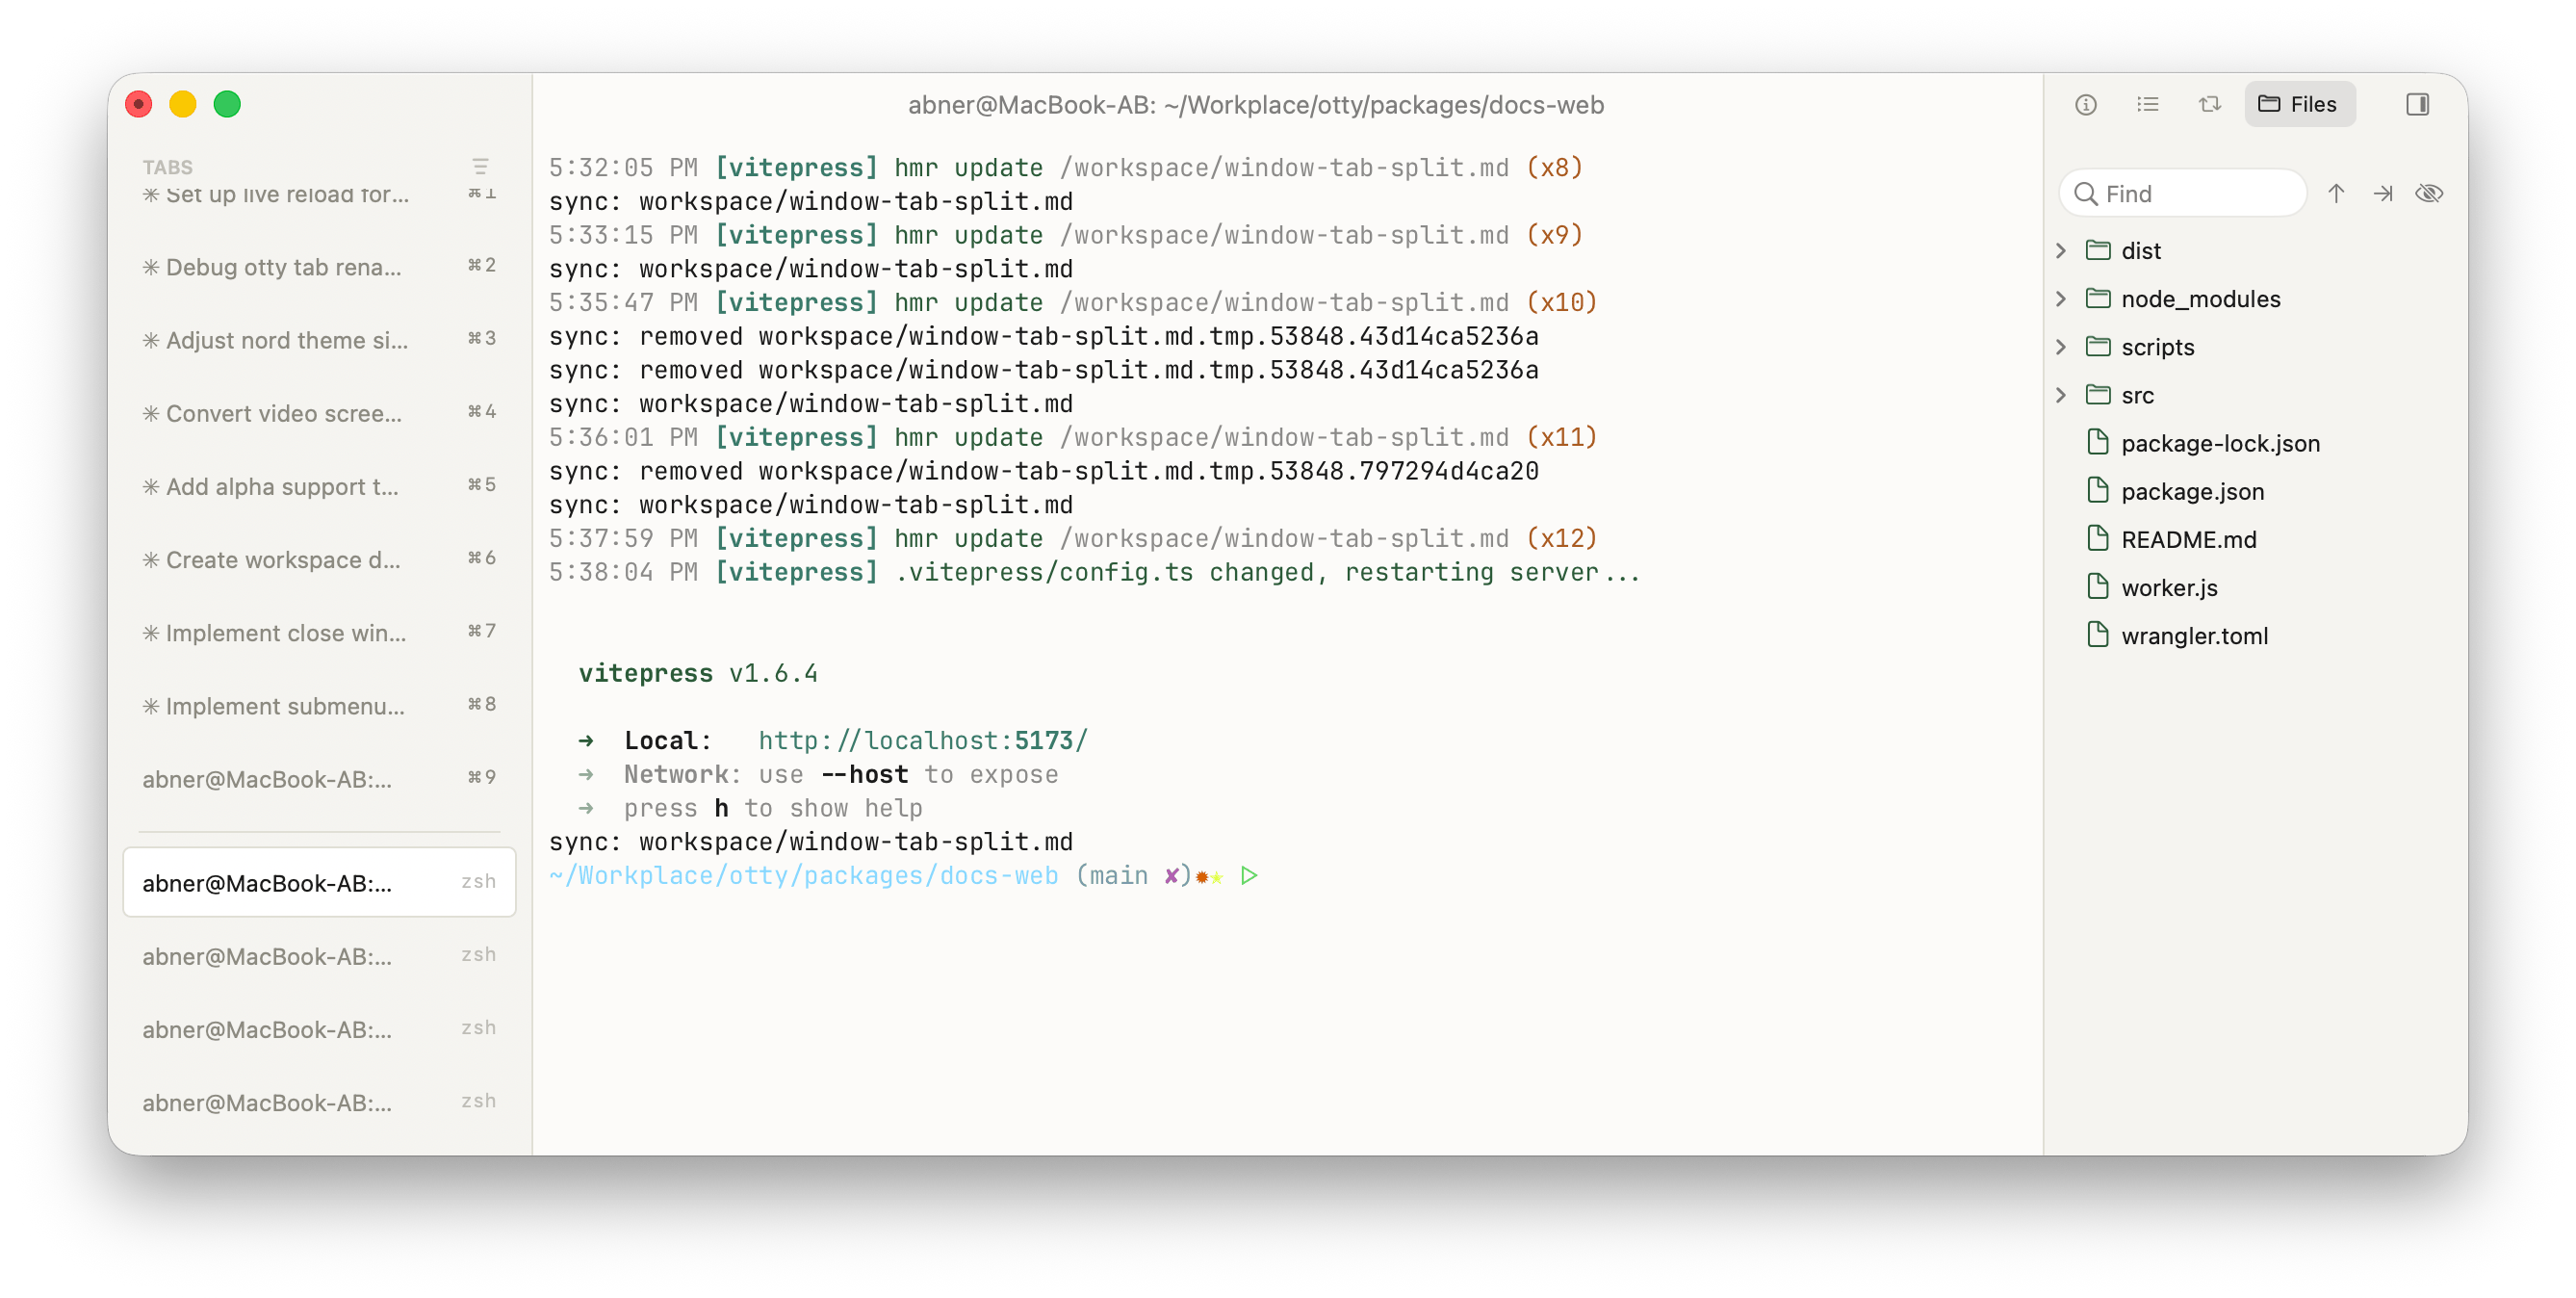
You can hover on window title and click toggle details panel button to toggle details panel, to see current folder content, git status, processes, and command history or file outline. For more information about details, please see Details Panel.
Title Bar
The title bar shows the active tab's window title, which by default tracks the running program (OSC 2 / OSC 0). To pin a fixed title — or prepend a prefix to the dynamic one — see Window and Tab Title above. Switching tabs updates the window title to match the newly active tab.
Window Resize and Default Window Size
Drag any window edge or corner to resize; the terminal grid reflows to fit. How a new window is sized is set by window-size (Settings → Appearance):
| Value | Behavior |
|---|---|
remember (default) | Reopen at the size and position of the last window you closed. |
grid | Size the grid to an exact cell count — window-cols × window-rows (default 80 × 24) at the active font's metrics. Window chrome is added on top so the grid lands at exactly that many cells. |
frame | Use a literal pixel content rect — window-width-px × window-height-px (default 1000 × 600). The grid is whatever fits after chrome. |
ini
window-size = grid
window-cols = 120
window-rows = 40
Pin Window
View → Pin Window keeps the current window floating above all other apps' windows, so a log or monitor stays visible while you work elsewhere. When pinned, a pin button appears in the title bar — click it to unpin (or run Pin Window / Unpin Window from the Command Palette).
Watch Tasks in Window
If you just want to watch task running status in a window, compared with Pin Window, you could also set notification when the task is finished, or toggle Picture in Picture.
Picture in Picture
View → Picture in Picture pops a pane out into a system floating window that stays on top even when Otty is in the background or on another Space. Two modes:
| Mode | Behavior |
|---|---|
| Current Pane | Pops out the pane you choose; it keeps showing that pane regardless of focus. |
| Follow Active Pane | The floating window always mirrors whichever pane is currently active. |
Run them from the View menu, or from the Command Palette (pip). Close it with Close Picture in Picture or the window's standard PiP controls.
Tab
Otty's default layout is a vertical tab sidebar on the left of every window. Each tab is an independent terminal session. A horizontal tab bar (window-layout = tabs-top or tabs-bottom) is also available — see Horizontal tab bar below.
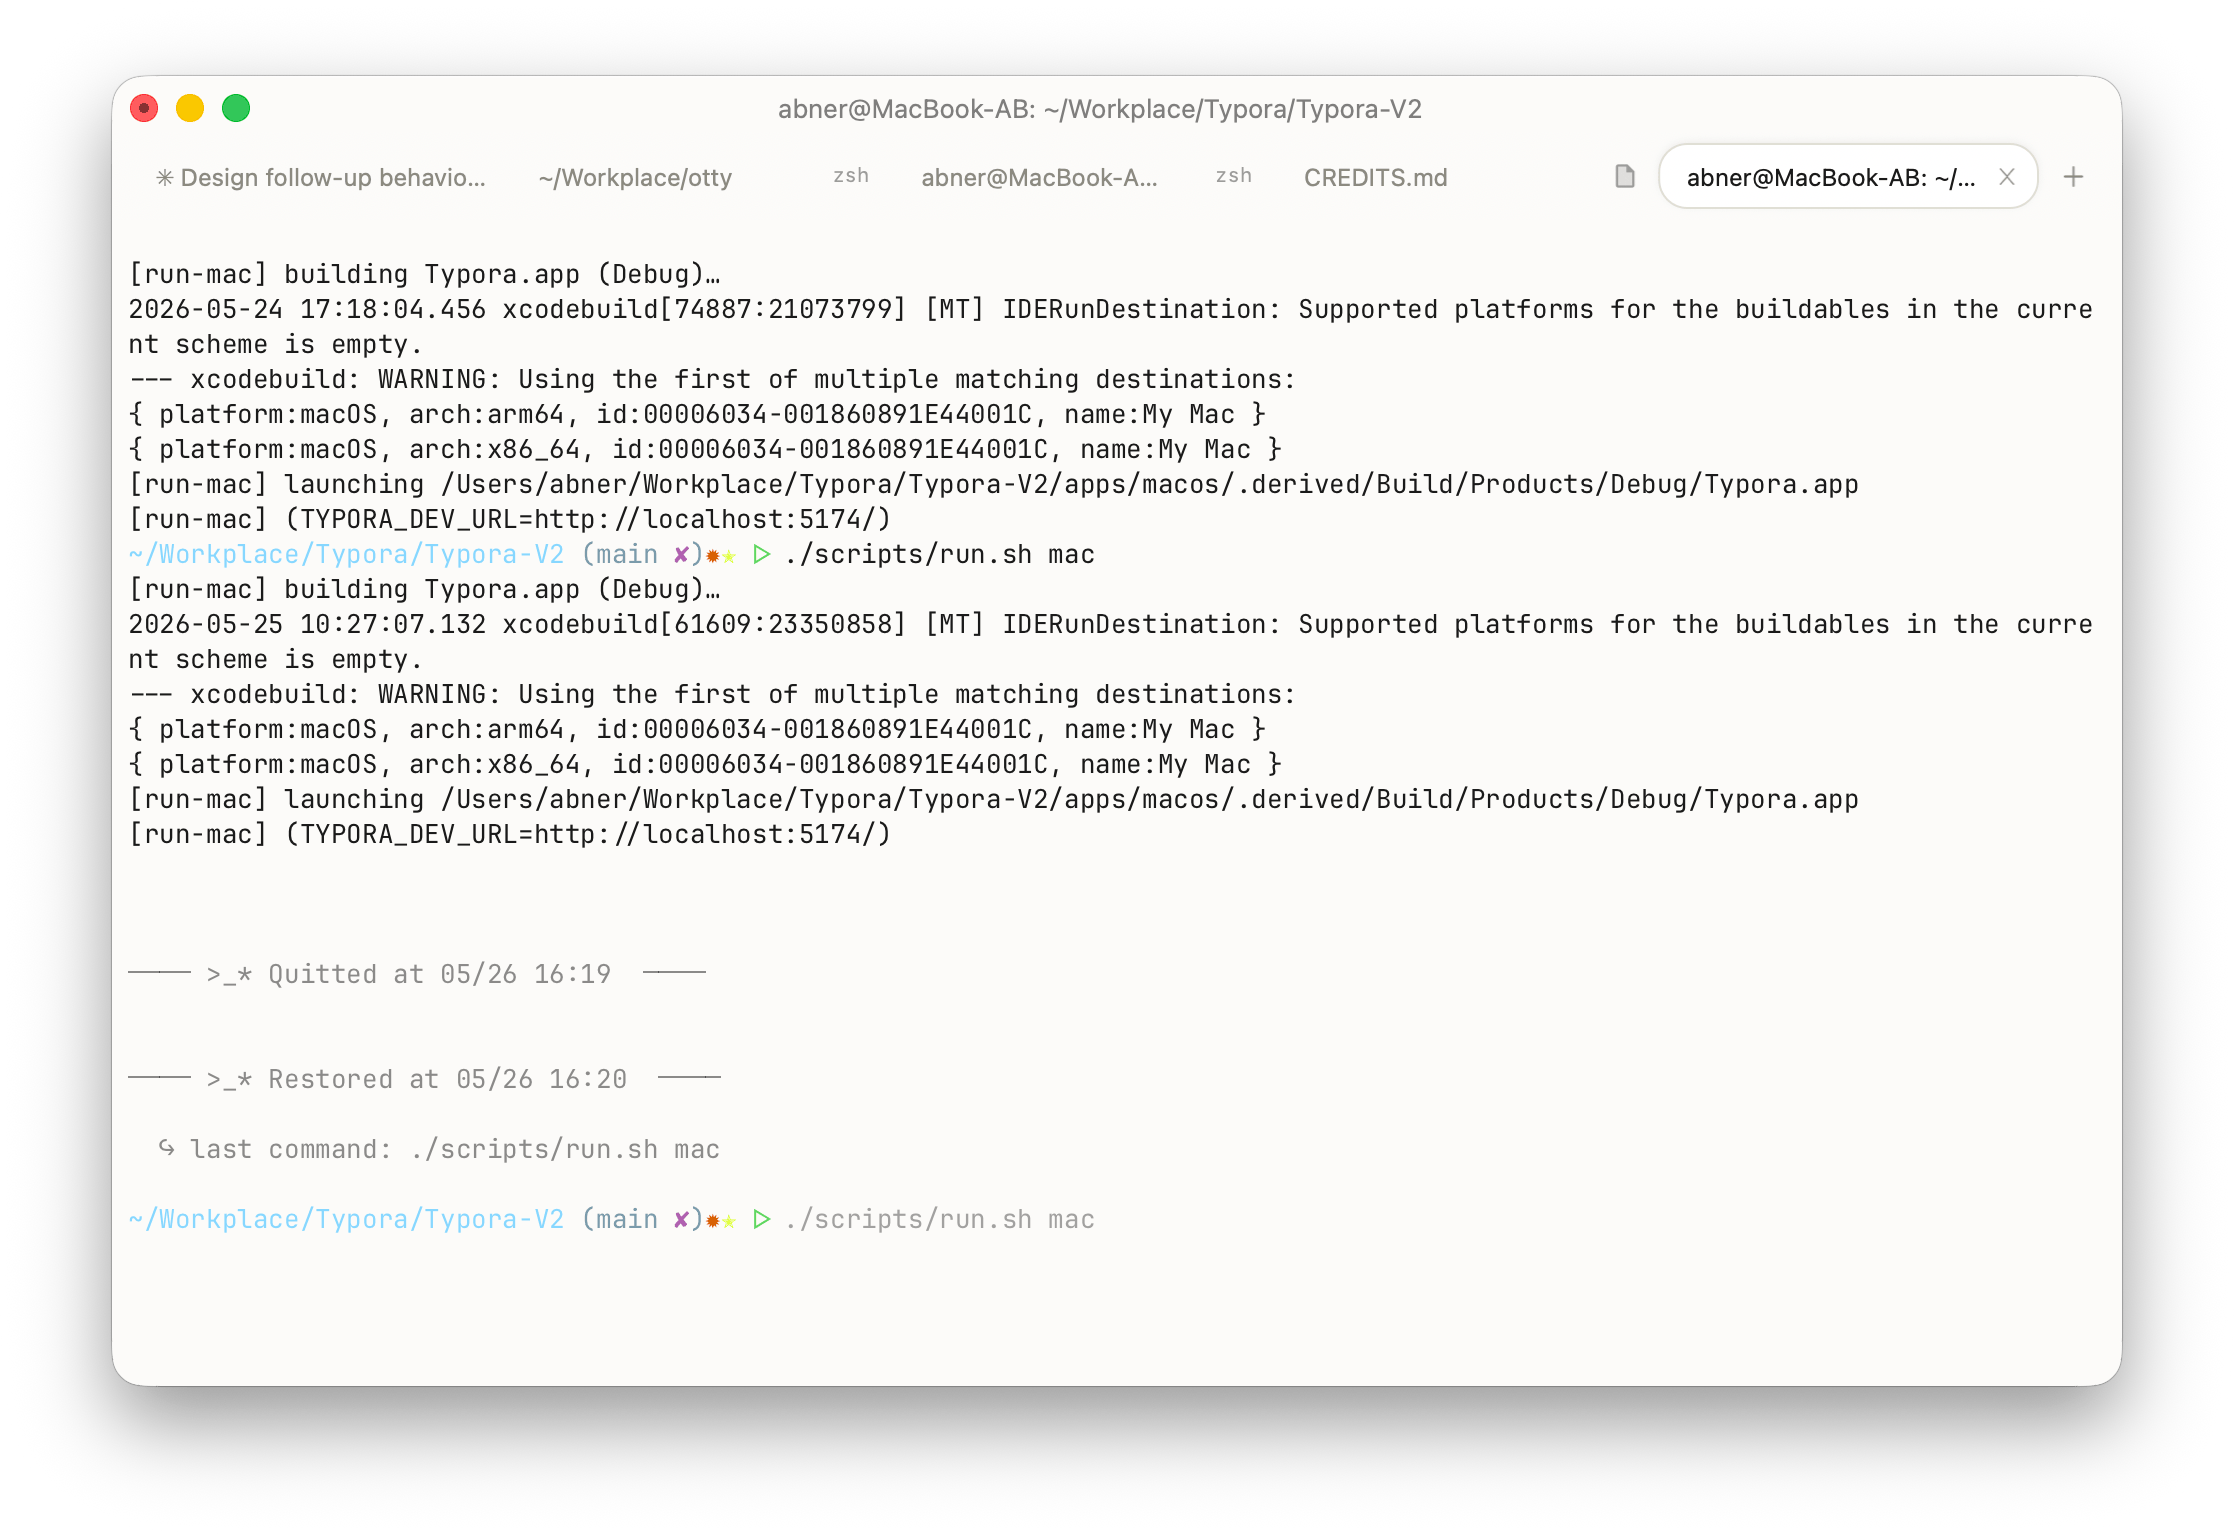
Horizontal Tab Bar
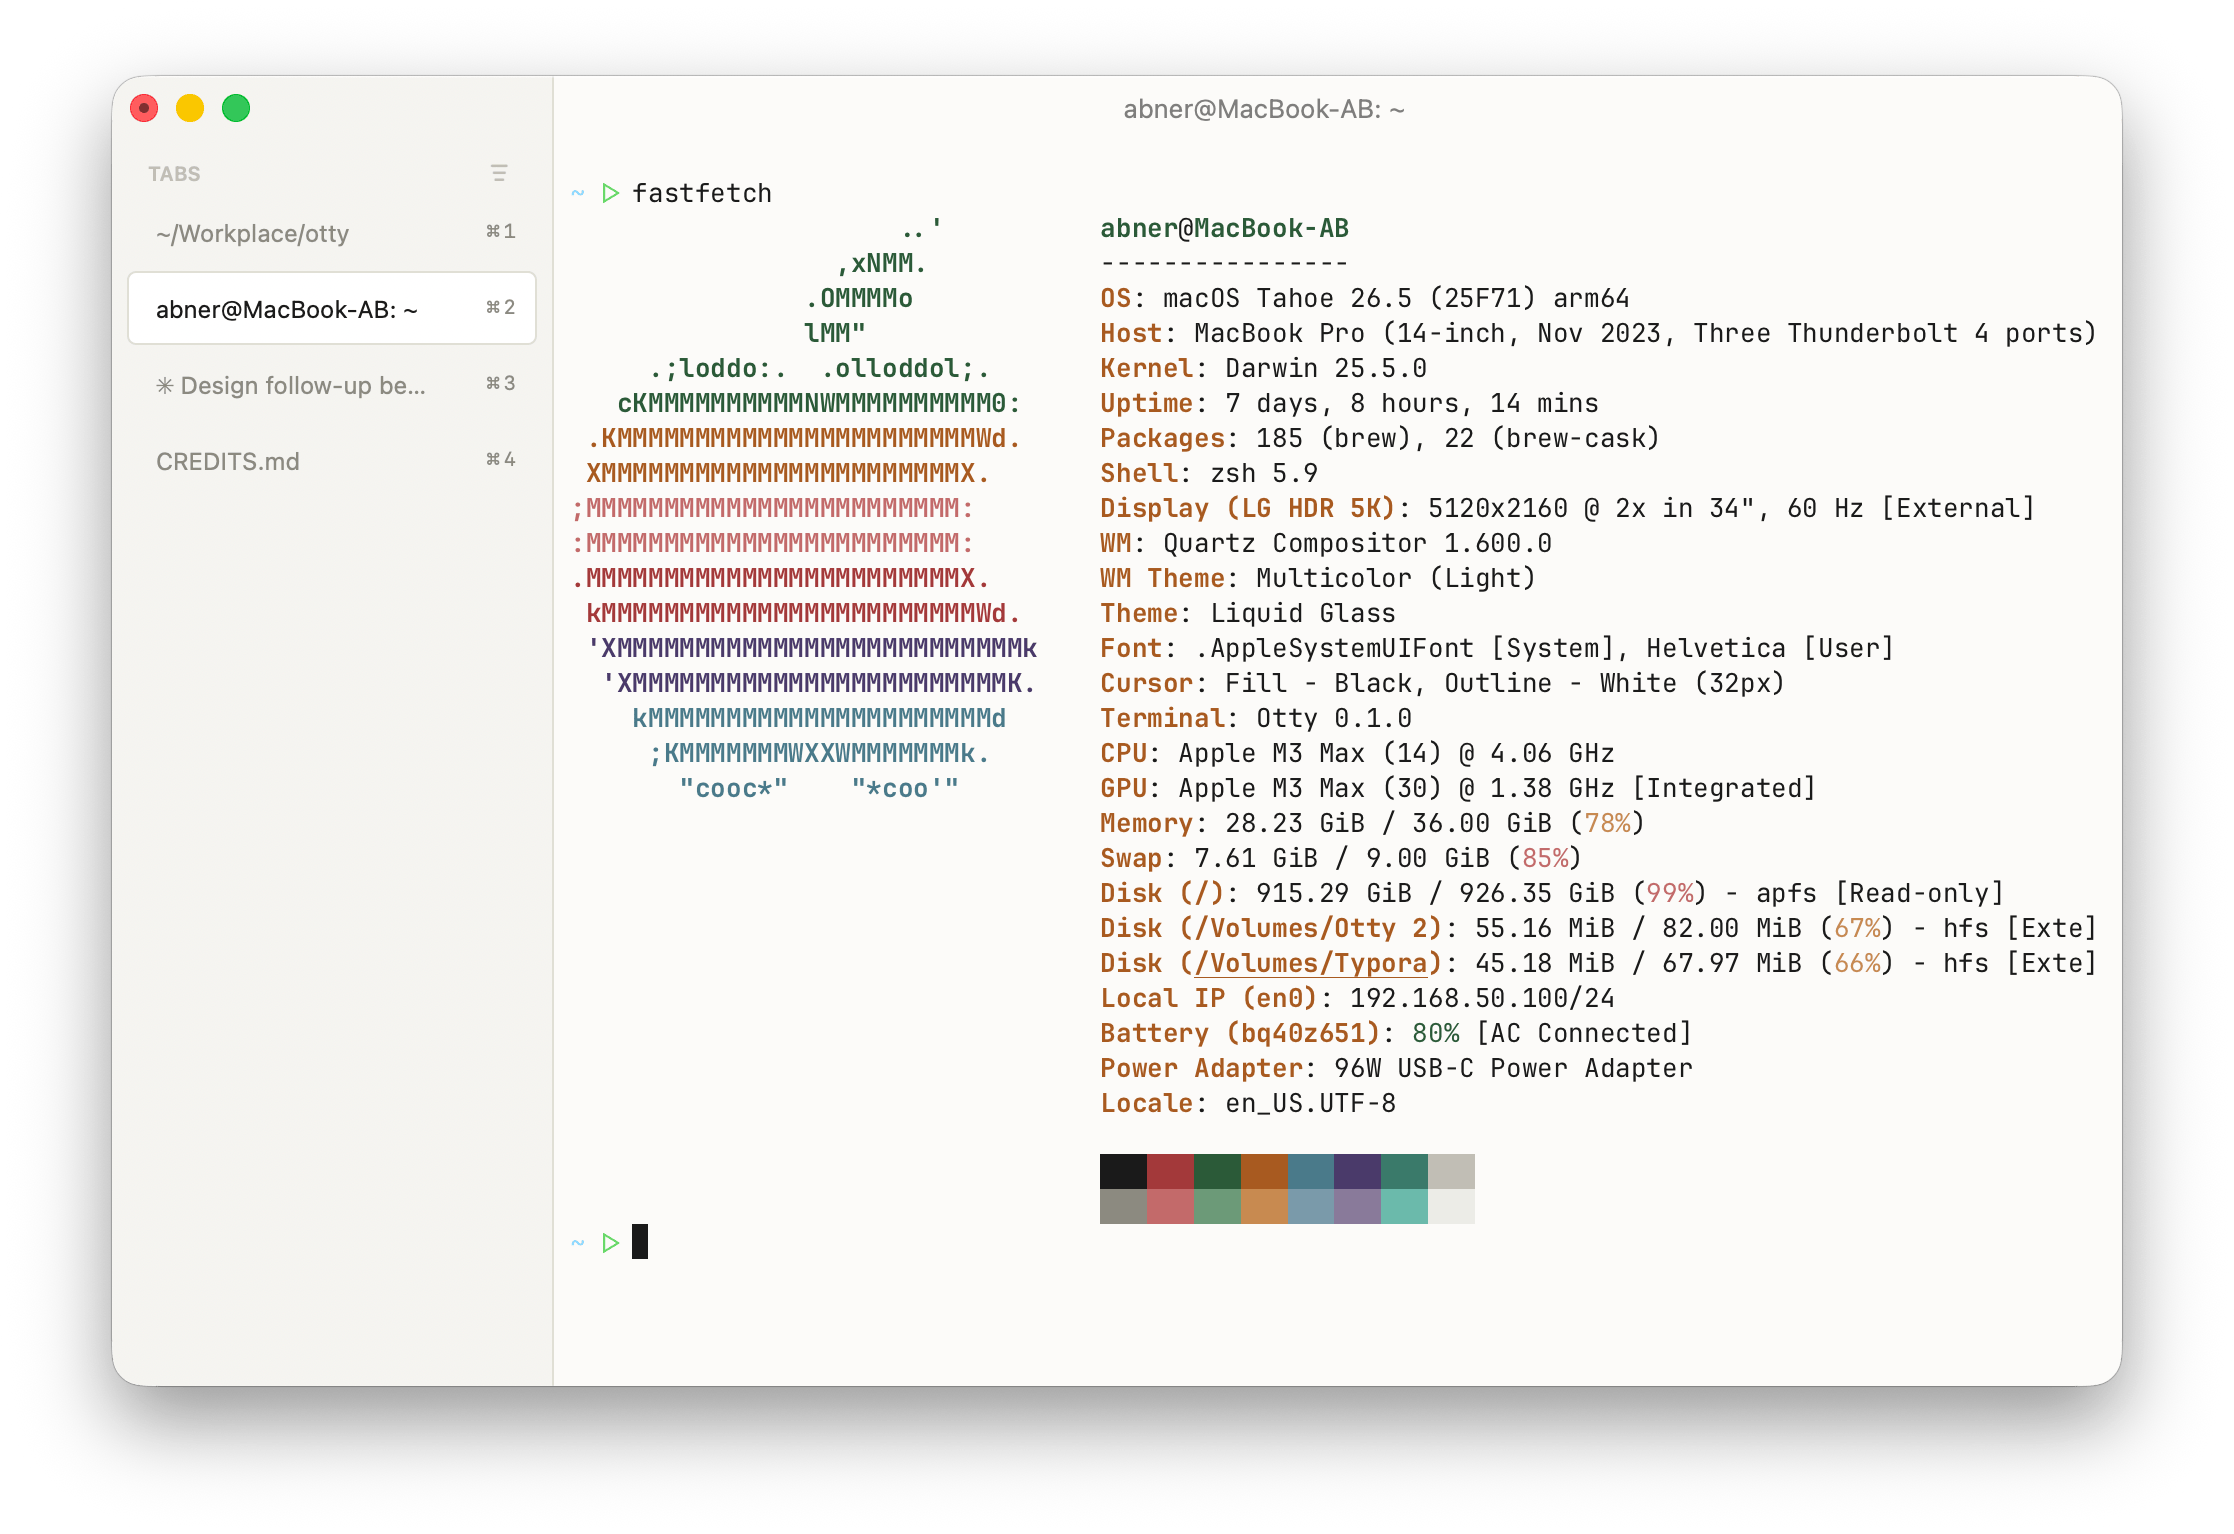
You can switch window layout from vertical tab sidebar, tabs bar on top and tabs bar on bottom from Settings → Appearance → Layout.
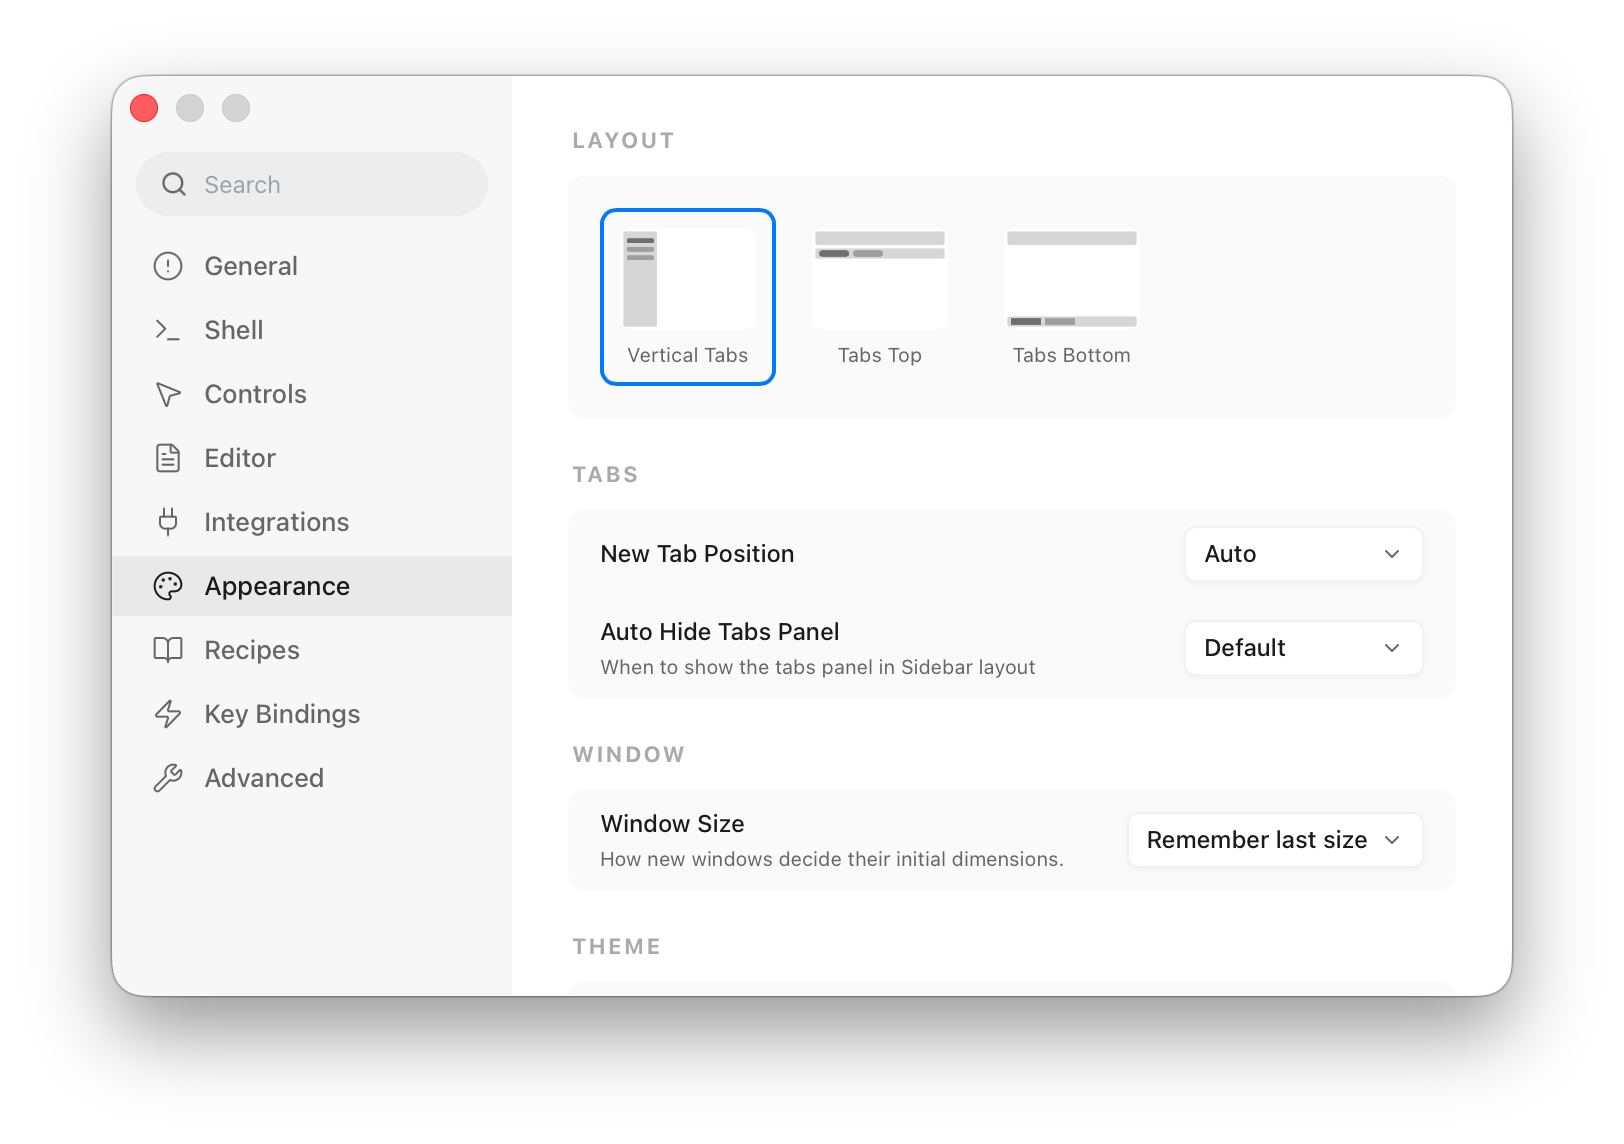
The switching, reordering, and labeling rules above apply identically in horizontal mode.
Sort, Group and Divide Tabs
(vertical tabs panel only — the horizontal bar keeps a flat strip)
Click the filter button at the top of the tabs panel — or right-click an empty area of the panel — to open a menu with three sections:
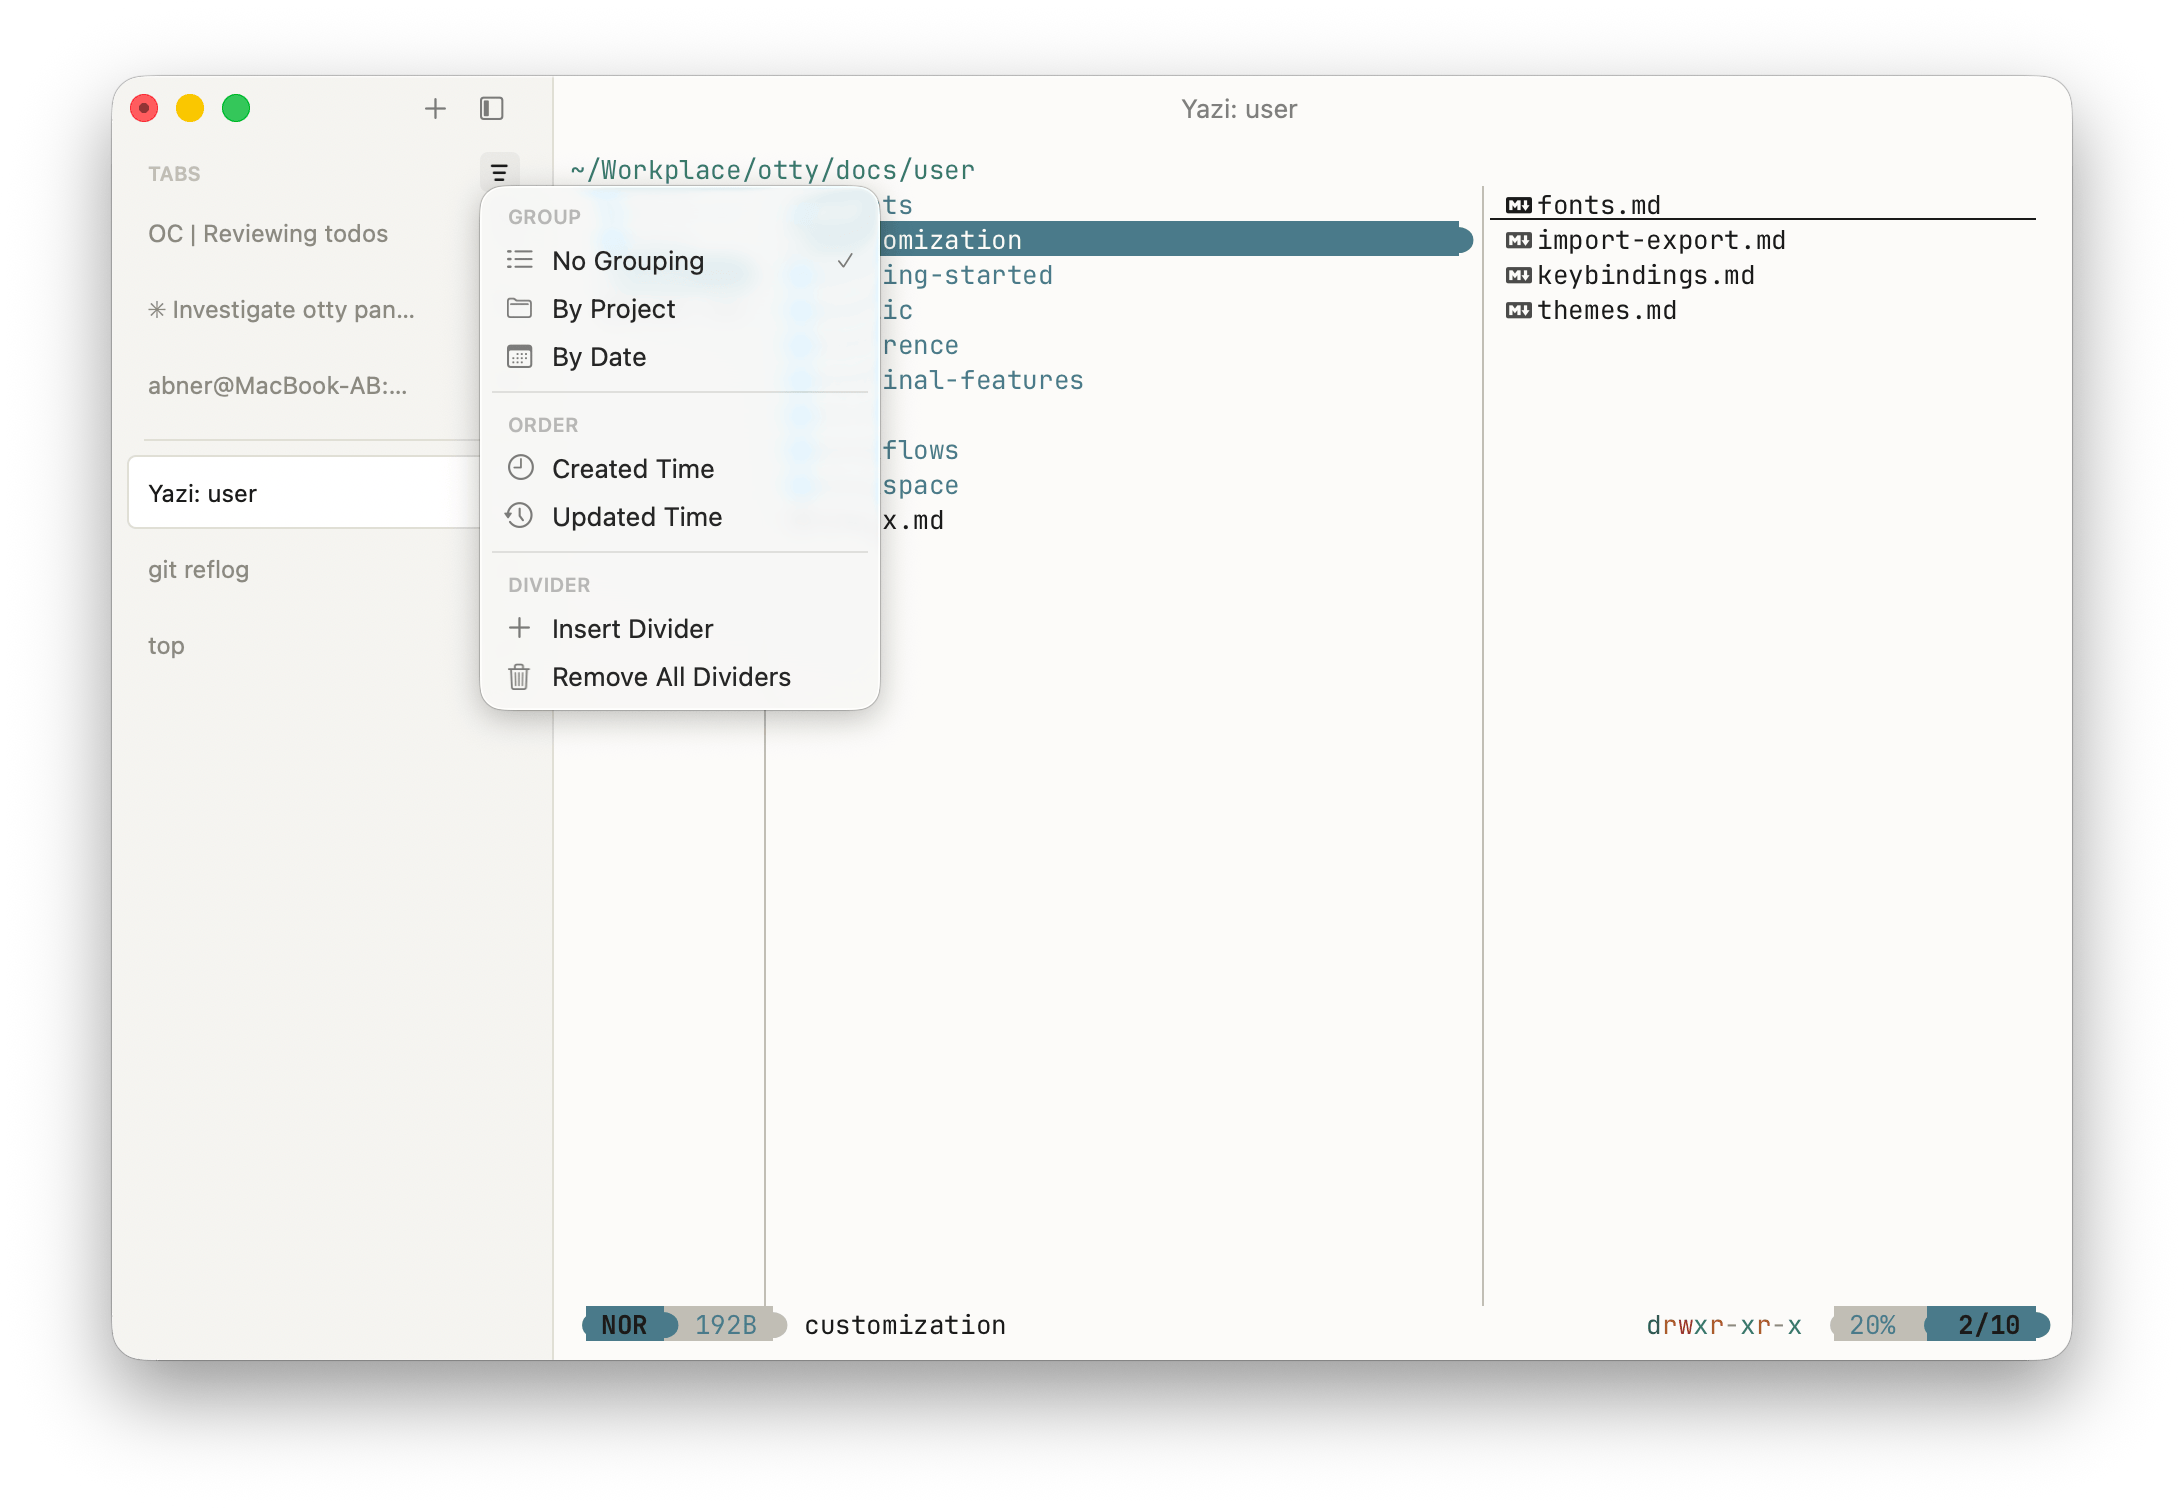
Group — break the list into collapsible sections:
| Mode | Behavior |
|---|---|
| No Grouping (default) | One flat list. |
| By Project | Group tabs by their git repository / project root. |
| By Date | Group by when the tab was last active (Today, Yesterday, …). |
Order — how tabs sort within a group:
| Mode | Behavior |
|---|---|
| Created Time (default) | Oldest-opened first. |
| Updated Time | Most-recently-active first. |
| Manual | Set implicitly the moment you drag a tab to reorder — the menu deselects the time orders. |
Divider — when grouping is off, insert your own labeled separators to hand-group unrelated sessions. Choose Insert Divider from the menu, or right-click between two tabs. A divider can be renamed, dragged, and deleted like a tab; Remove All Dividers clears them at once. (Dividers are disabled while a Group mode is active, since the sections come from the grouping rule instead.)
Group, order, and collapsed sections are remembered per window across session recovery.
New Tab Position
Control where a freshly-opened tab lands with new-tab-position (Settings → Appearance → New Tab Position):
| Value | Behavior |
|---|---|
auto (default) | Context-aware. Empty tabs (⌘T) land at the end of the current section — just before the next divider, or the end of the strip. Tabs opened with content (a file pane, an agent history view) drop in right after the current tab, keeping the related tab nearby. |
end | Always appended to the end of the tab list. |
after-current | Always inserted directly after the active tab. |
Auto Hide Tabs Panel / Bar
Otty can hide the tab strip when you don't need it. The policy splits by layout — auto-hide-tabs-panel governs the sidebar (sidebar-left), auto-hide-tab-bar governs the horizontal bar (tabs-top / tabs-bottom) — but both take the same three values:
| Value | Behavior |
|---|---|
default (default) | No automatic hiding — you control it with the show/hide toggle. A new window opens with the same state as the window you opened it from, so hiding the panel "sticks" as you spawn more windows. |
always | Shown by default. New windows always open with it visible, and switching to this mode reveals it everywhere. You can still hide it per-window with the toggle; opening or closing tabs won't force it back. |
auto | Driven by tab count — hidden with a single tab, shown once you have two or more, updating as tabs open and close. |
The show/hide toggle is per-window: closing the panel in one window never hides it in another. Each window also restores its own panel state across a restart via session recovery, independent of the policy above.
Set them under Settings → Appearance, or in your config file:
ini
auto-hide-tabs-panel = auto
auto-hide-tab-bar = auto
Rename Title
By default a tab's name tracks the running program's icon name (OSC 1 / OSC 0), falling back to the window title when the program sets only that. To pin your own Name or add a Prefix — and how those persist across restarts — see Window and Tab Title above.
Tab Badge
A badge is the small status indicator Otty draws on a tab so you can see what a session is doing without switching to it — useful when a long command or an agent is running in a background tab. Badges update automatically from what the tab is running:
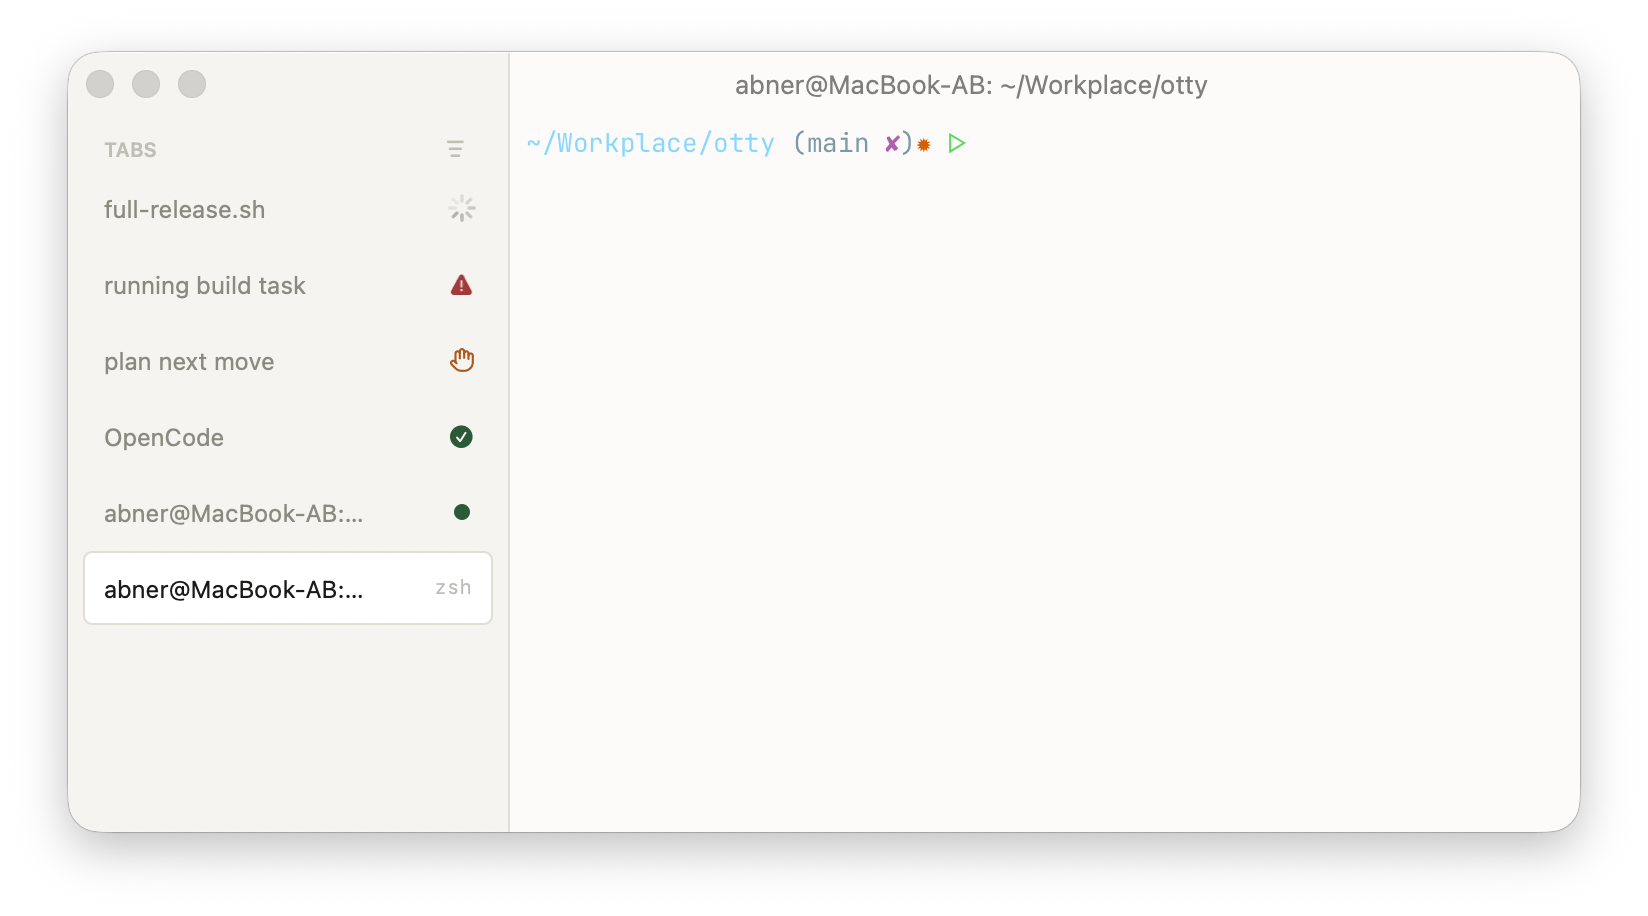
| Badge | Meaning |
|---|---|
| Spinner | The session is busy — a long-running command, or OSC 9;4;1 progress. |
| Checkmark | A command just finished (shown briefly, then clears). |
| Accent dot | A command exited successfully (0) in a tab you're not looking at. |
| Error triangle | A command exited with a non-zero status. |
| Hand | An agent (e.g. Claude Code) is waiting for your input. |
| Coffee cup | caffeinate is keeping the system awake for this tab. |
| Shield | A sudo / su session is active in this tab. |
| Devices | The session is running on a remote host via SSH |
You can config whether to display the related badge from Settings → Shell → Tab Badge, or from menubar, context menu and titlebar dropdown per-tab individually.
You could use otty watch <YOUR COMMAND> to wrap a command, so Spinner, Checkmark, Error triangle badge and notification will be displayed based on the command running status.
To dismiss a badge by hand, right-click the tab and choose Clear Badge. The active tab never shows the success dot or completion checkmark — they only mark unattended activity — but the spinner, awaiting-input, caffeinate, and sudo badges always show, since they reflect ongoing state.
Split Panes
A split divides a single tab into multiple panes, side-by-side or stacked.
Rearranging Splits
Otty's drag-and-drop is more flexible than Ghostty's. In Ghostty a pane can only swap with a neighbor, so a layout like moving the top-left pane to become a full-height column down the right edge simply isn't reachable by dragging. Otty drops a pane onto any edge of a target — the four edges map to split above / below / left / right of that pane — and resolves the result against the whole tab, so the same drag can turn a 2×2 grid into a full-height side column. See Drag and Drop for how drop zones map to the resulting layout.
Resize Splits
Drag any divider between two panes to resize them. To resize from the keyboard, focus a pane and nudge its divider with ⌘⌃⇧ + an arrow key — ⌘⌃⇧→ grows toward the right, ⌘⌃⇧↓ toward the bottom, and so on. To even out a lopsided layout, run Equalize Splits (⌘⌃=) and every pane in the tab springs back to an equal share.
Quickly Auto Layout
You can double click on the border of split views to get all panes resized to similar size.
Switch to Split Pane
Click any pane to focus it, or move focus from the keyboard:
⌘]/⌘[— cycle to the next / previous pane in the tab.⌘⌃←⌘⌃→⌘⌃↑⌘⌃↓— move focus to the pane in that direction.
The focused pane carries a subtle highlight in its toolbar, and pane-scoped shortcuts (⌘F, scrolling, paste) route to it. When a tab has only one pane, the cycle shortcuts pass through so they stay free for other uses.
Dimming of Unfocused Panes
By default the panes that don't have focus are drawn slightly faded, so the active one is easy to spot. If you're watching several panes at once — agents, builds, tailing logs — that fade works against you.
Settings → Appearance → Window → Unfocused Split Opacity controls it. Drag the slider to 1.00 and every pane stays fully clear no matter which one has focus. Lower values fade the inactive panes more.
TIP
This is a separate knob from Faint Opacity, which only affects text a program prints with the SGR faint attribute — changing it has no effect on how split panes are dimmed.
Open and Close Views
Open Options
A new view's starting directory is controlled per scope, so a new split can inherit your current location while a brand-new window starts at $HOME:
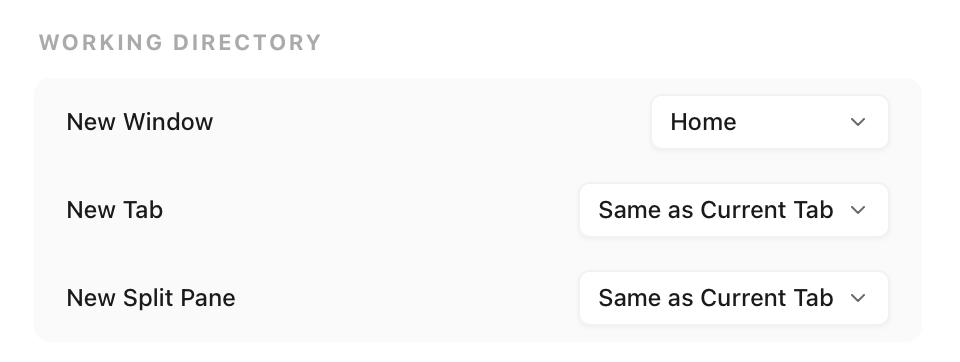
Same as Current Tab (inherit) reuses the working directory of the currently focused pane; Home (home) starts at $HOME. The global working-directory key sets a fallback for all of them and also accepts an absolute path. Where a new tab is inserted in the list is a separate setting — see New Tab Position above.
When All Windows Are Closed
Otty can either stay running after you close the last window, quit completely, or keep a fresh window ready for the next time you activate the app.
Configure this in Settings → General:
| Setting | Behavior |
|---|---|
| Quit When All Windows Closed | Otty quits when the last window closes. Use this if closing the last window should end the app, like many document-style Mac apps. |
| New Window When All Windows Closed | Otty stays running and opens a new window after the last window closes, so clicking the Dock icon or using your global hotkey always lands in a ready terminal. |
The two options are mutually exclusive. If Quit When All Windows Closed is on, New Window When All Windows Closed is disabled because there is no running app left to reopen a window.
Close Confirm
To avoid losing work, Otty can prompt before closing. Two independent keys (Settings → General):
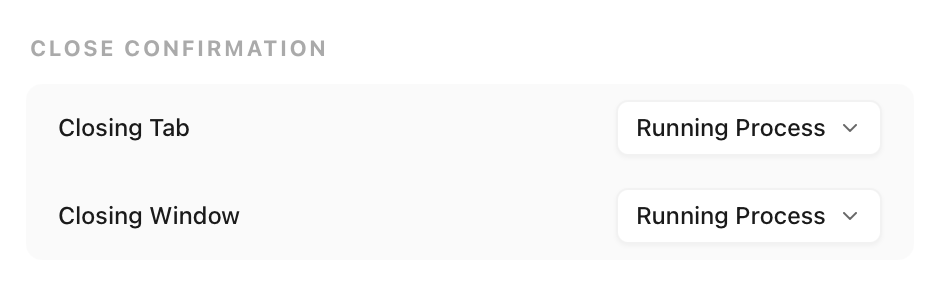
- Running Process (
process) — only prompt when a child process other than the shell is still running (e.g. an editor, a server, ansshsession). - Always (
always) — always prompt. - Multiple Tabs (
multiple_tabs) (window only) — prompt only when the window holds more than one tab. - Never (
never) — never prompt; close right away.
Hide Close Button Dot (also under Settings → General) stops Otty from ever showing the unsaved / running dot on the window's close button (the red traffic light). Turn it on if you close windows freely and don't want the reminder.
Reopen last closed
Closed a tab by mistake? Press ⇧⌘T to bring it back. The recently-closed list is a stack, so pressing it repeatedly walks back through the tabs you closed, most-recent first — each restored with its working directory and title. The list persists across restarts and crashes, so a reopened tab also recovers its content where possible; see Session Recovery.
Shortcuts
| View | Open | Close |
|---|---|---|
| Pane | ⌘D right · ⌘⌥D left · ⌘⇧D down · ⌘⌥⇧D up | ⌘W |
| Tab | ⌘T | ⌘W |
| Window | ⌘N | ⇧⌘W |
⌘W cascades: it closes the focused pane first; once that's the tab's last pane it closes the tab; once that's the window's last tab it closes the window. Reopen the last closed tab with ⇧⌘T.
To open a non-terminal view — a file, folder, or URL — drop it onto a pane edge (see Drag and Drop) or run otty view <file> / otty open <dir-or-url> from the shell. All shortcuts above are customizable under Settings → Keybindings (reference).
Save and Restore Layouts
Press ⌘S (File → Save…) to save the current layout as a Recipe — a reusable snapshot of your tabs, panes, and working directories. Choose a scope in the dialog (Current Tab, Current Window, or just a list of Commands) and a content level:
| Content level | What's stored |
|---|---|
| Layout Only | The pane tree and each pane's working directory. |
| Include Scrollback | The above, plus each pane's scrollback, restored on open. |
| Include Commands (replay on open) | The above, plus the commands to re-run when the recipe opens. |
Pick Include Commands when you want Otty to rebuild a working session, not just an empty layout — e.g. a terminal on the left, yazi running in the bottom pane, and lazygit on the right. Opening the recipe recreates the splits and replays those commands into the matching panes.
Restore a saved layout from File → Open Recipe…. See Recipes for editing the command list, per-recipe shortcuts, and sharing recipes as .ottyrecipe files.
Switch to Tab / Pane
Jump straight to a tab by index with ⌘1–⌘9, or step through them with ⌘⇧] / ⌘⇧[. ⌘⇧U jumps to the next tab carrying an unread badge — a finished command, an error, or an agent awaiting input — wrapping around the list.
To search across every tab and pane (plus recent files and folders) instead of stepping one at a time, open the fuzzy switcher with ⌘⇧O — see Open Quickly. Any command on this page is also reachable by name from the Command Palette (⌘⇧P).
Within a tab, move between split panes with ⌘] / ⌘[ or the directional ⌘⌃ + arrow keys — see Switch to Split Pane above.
Shortcut Keys
Every binding below is the default and fully customizable under Settings → Keybindings — see the Keybindings Reference.
Window
| Action | Default |
|---|---|
| New window | ⌘N |
| Close window | ⌘⇧W |
| Minimize | ⌘M |
| Toggle full screen | ⌘⌃F |
Tab
| Action | Default |
|---|---|
| New tab | ⌘T |
| Close tab / pane | ⌘W |
| Reopen last closed | ⌘⇧T |
| Next / previous tab | ⌘⇧] / ⌘⇧[ |
| Go to tab 1–9 | ⌘1–⌘9 |
| Jump to unread tab | ⌘⇧U |
| Toggle tabs panel | ⌘⇧L |
| Toggle details panel | ⌘⇧R |
Pane
| Action | Default |
|---|---|
| Split right / left | ⌘D / ⌘⌥D |
| Split down / up | ⌘⇧D / ⌘⌥⇧D |
| Focus next / previous pane | ⌘] / ⌘[ |
| Focus pane by direction | ⌘⌃← ⌘⌃→ ⌘⌃↑ ⌘⌃↓ |
| Move divider | ⌘⌃⇧← ⌘⌃⇧→ ⌘⌃⇧↑ ⌘⌃⇧↓ |
| Equalize splits | ⌘⌃= |
See also
- Drag and Drop — how drop targets map to layout.
- Files and Links — file panes, folder panes, and clickable paths.
- Open Quickly — fuzzy-jump across tabs, panes, and recent items.